DIY Overdyed Area Rug
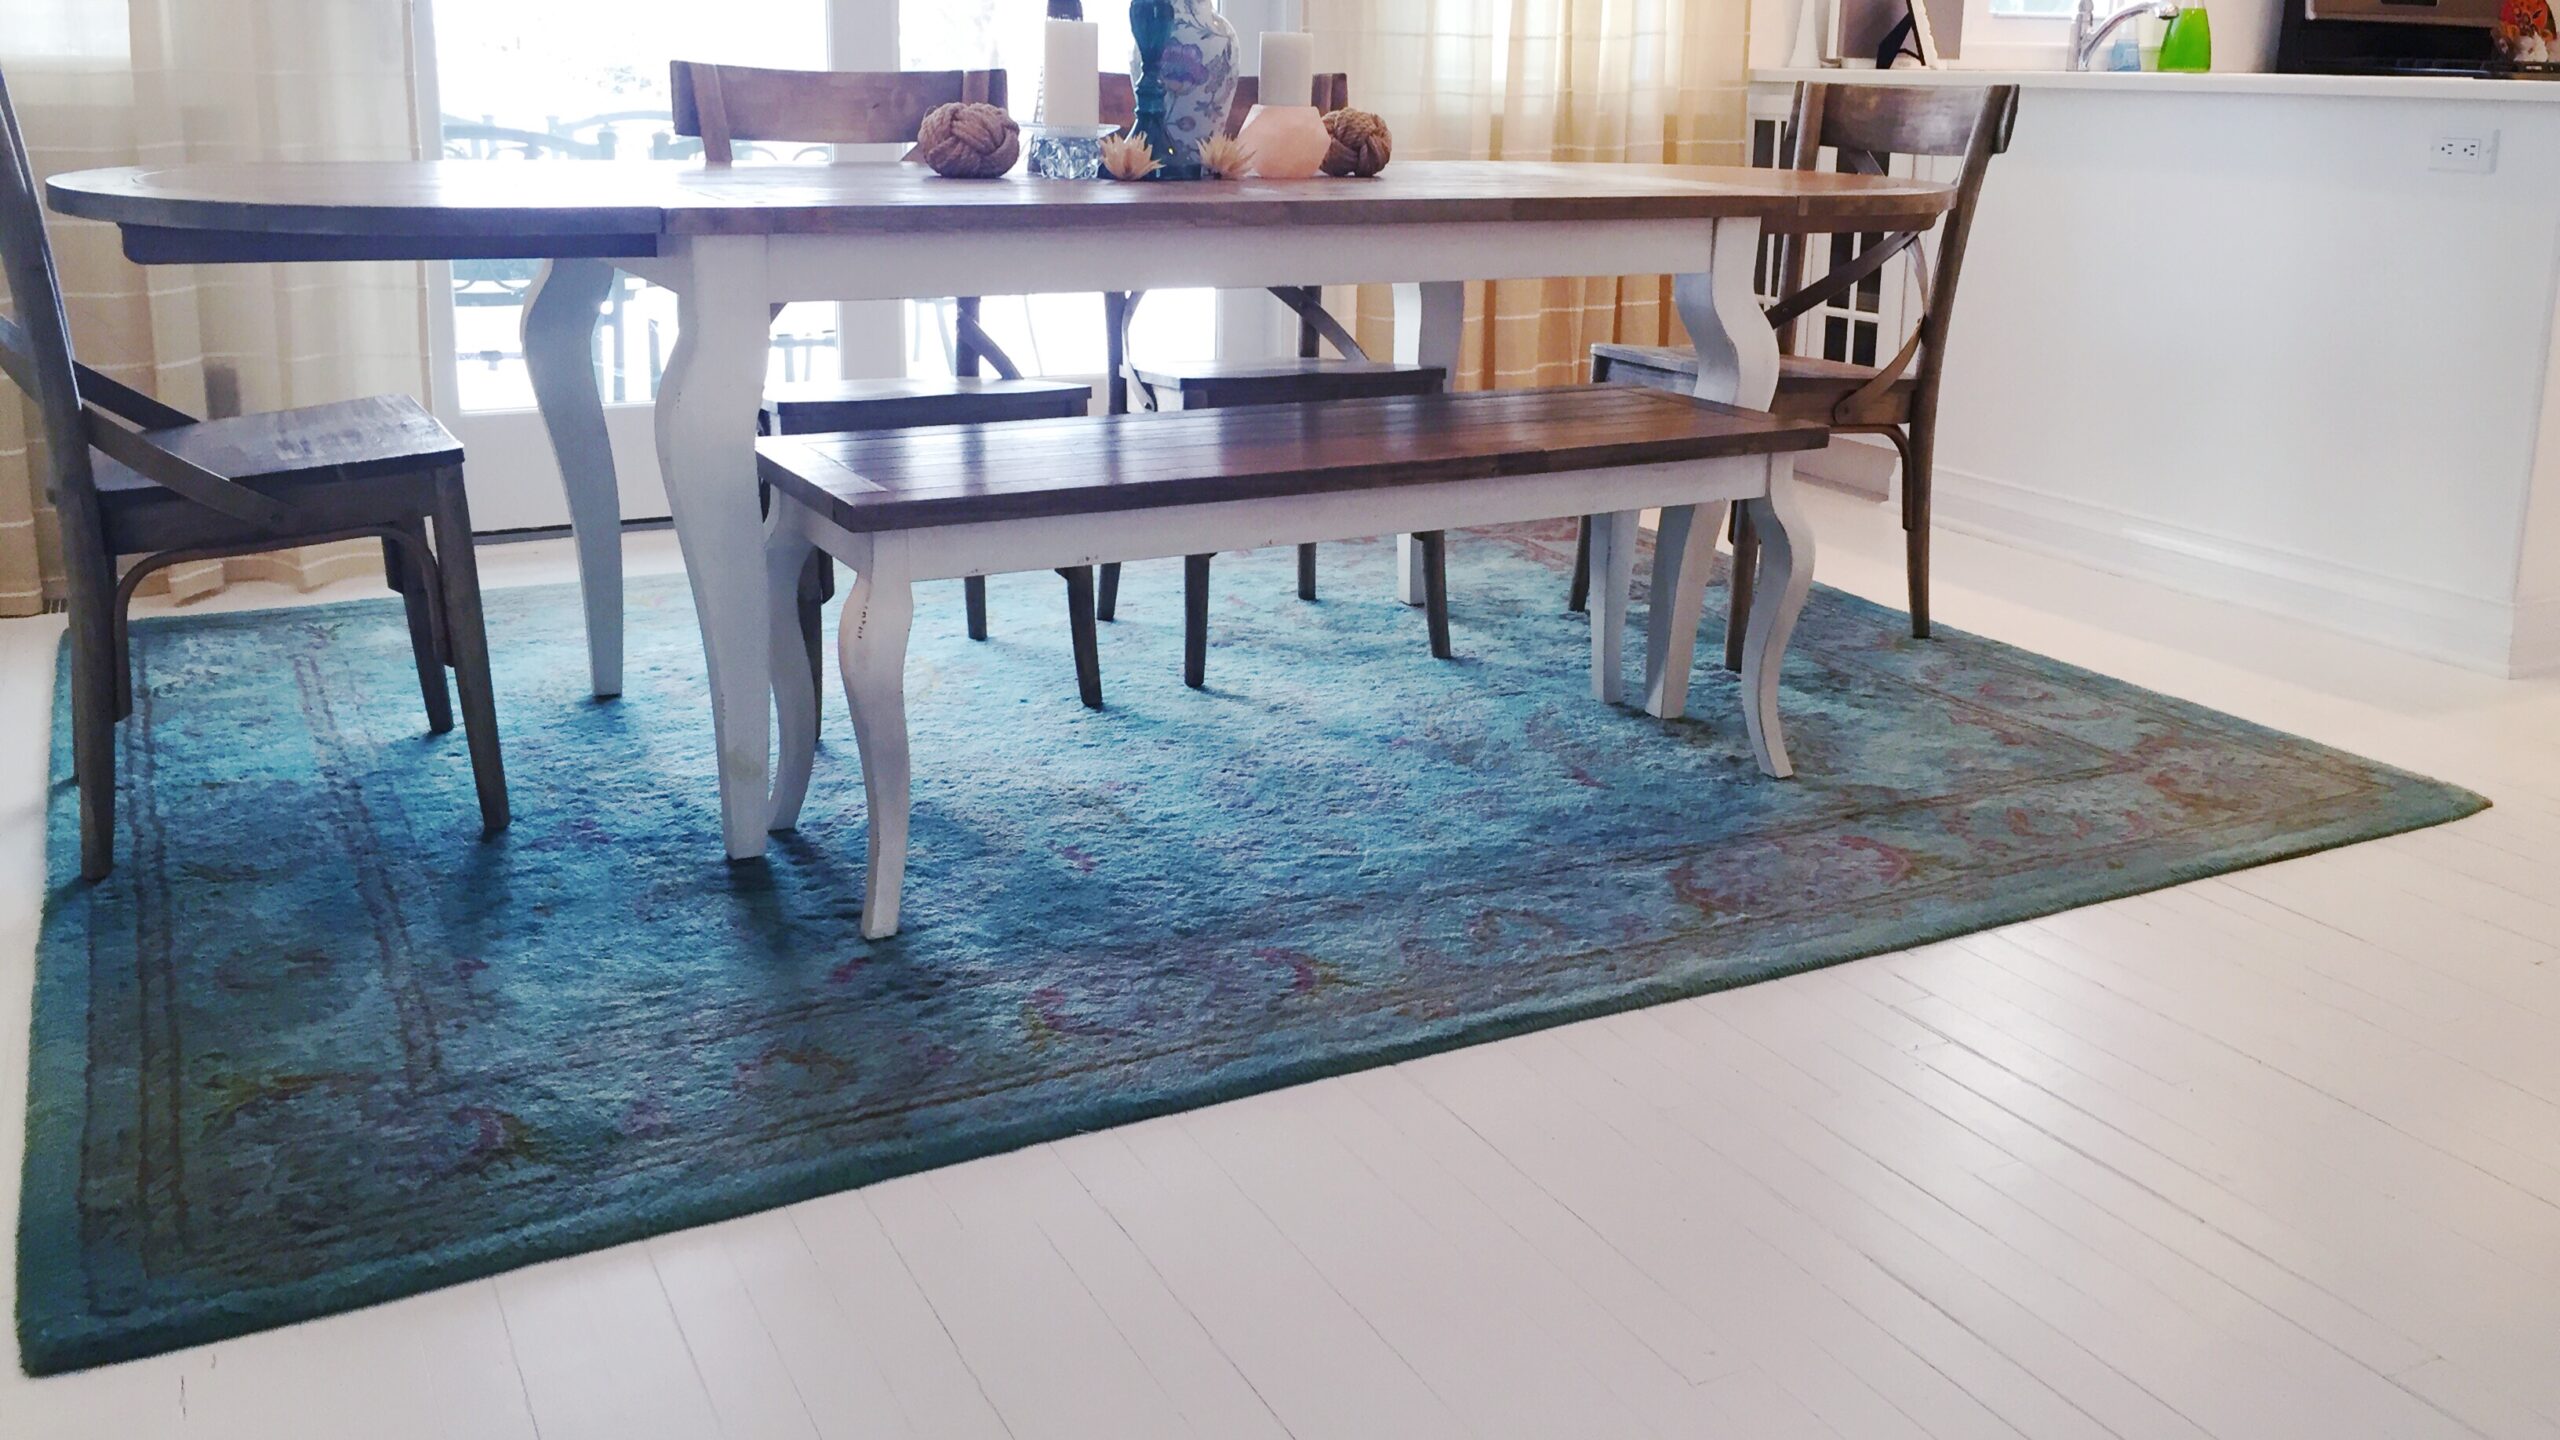
With our move to the East Coast, we had to do some downsizing. While we had two living areas in our first house in Texas, we now only have one. That meant I had to stick with only my favorite things from each and somehow make them work together. Enter this rug:

It wasn’t terrible as it was. Yes, a little brown in the high-traffic areas while the center showed its cream beginnings, but I got it off of Craigslist for forty bucks four years ago and I still think it was a heck of a steal. Now that things have changed, though, it needed a makeover.
Right now, the overdyed look is really hot. I’m seeing it everywhere.
This one in Mara Ferreira’s home on Glitter Guide was what I was going for:

Rugs of the size I needed in that style range from $300 used-$650 new. Plus, I’m all about reducing and reusing. I scoured the internet for some advice on going about it myself. First, I found a post about overdying a rug from The Red Brick. Her post was detailed, but she used silk screening ink, which I have zero experience in. I decided I wanted to use RIT dye, because I’ve dabbled in RIT dye quite a bit, like when I made Tobias’ baby Bam Bam Rubble Flintstones costume.
I found some advice using fabric dye from Apartment Therapy, where a woman used a spray bottle for a smaller rug, and A Girl Named Wallis, who wrote a super funny post on how she made a Monet/Anthropologie inspired rug using RIT dye.
Despite my research, I was still nervous about such a big project, and the likelihood that I could destroy my not-terrible rug. I waited until I had the help (and boost of confidence) from my friend who visited from down south before I began.
I can see the nearest craft store from my yard. It’s amazing. But it’s not open yet, so it is a bit of a drive to the second closest one. In fear of having to return to the store, we bought three bottles of teal RIT dye and three aquamarine, bringing the total to six bottles for a 6×9 (ish) rug. (Spoiler alert: we didn’t need that much. We needed about 2/3 of that.)
Supplies:
- 3 bottles teal RIT liquid dye
- 3 bottles aquamarine RIT liquid dye
- a tarp!
- 1 gallon bottle of white vinegar
- A clean trash can for mixing
- A spray bottle (I emptied out a Windex bottle into a vase, washed it, and when I was done, I put the Windex back.)
- Smaller bowl (for distributing the dye bath)
- Something to stir the dye bath (we used a broom handle)
Steps:
1. First off, we mixed the dye with vinegar, and added hot water. The water has to be hot for the fibers to take on the dye, so don’t try to cheat the system by using the water hose. We followed the instructions per the bottle and did it in increments, but always following a 1:1 ratio for teal to aquamarine.


2. Whenever we had a full batch of dye bath, we’d use mixing bowls to pour it on top of the rug that we had situated outside, on a tarp. The dye would pool in places, because the terrain is uneven, so we used the bottom of the bowl to push the bath out of those places and into spaces where it was more sparse.


3. At some point, we realized that the backing that was falling off (due to age, prior to the project’s beginning) was going to keep the rug moist way longer than we wanted, so we did away with it. (optional & situational)

4. I knew from past experiences with RIT that your dyeing isn’t done until you think the color is WAY too bright. There will be plenty of fading when you rinse. We waited for it to dry, to see if we needed some additional dye in other places, and it did. That’s when the spray bottle came in.

The spray nozzle didn’t work well this way, so I had to use the bottle it came with. This part was super tedious, and surely I have the forearms of a pubescent boy after all the squeezing to get enough dye out. I’m not sure if this is a necessity, but I really wanted the color to be even.
5. Let it soak. I took it off the tarp and put it on my cement porch, because the moisture was just stuck under it with the tarp*. I waited a couple of days, and I almost didn’t rinse it at all, because A Girl Named Wallis said she didn’t in her post. But, y’all. I’ve got white floors. I couldn’t run the risk of dyeing more than the carpet. So after a couple of days of letting it dry, I dumped a lot more water on it, and then waited more days.
I had a few more hiccups*, but ultimately, it ended up like this:


And I just love it!

*Hiccups: I’ve always got some hiccups. Here are some things to watch out for:
- The rug is SO heavy when it is wet. Maybe you already considered that, but I didn’t. Find a spot where there won’t be a bunch of leaves and a time of year where it won’t get rained on and stick to it.
- This is a warm, sunny weather project, but I couldn’t help when I moved up here and I’ve got a
 kind of attitude when it comes to making things. It took FOR-E-VER to dry.
 - In fact, I waited a week but it still wasn’t dry and I wanted it in my dining room already (see Willy Wonka image above) so I went for it. Well, it got dry more quickly in my heated home…and then it started to mildew. And stink. A LOT. I tried to use traditional carpet cleaners and powders, but ultimately what worked was this baking soda carpet cleaning technique. If you run into this problem, save your money and don’t fall for cleaner gimmicks, and save yourself some time and just go ahead and get 5 boxes of baking soda and apply that stuff liberally.
- As with all dye projects, I should have tested the color out first. RIT’s “teal” came out a more hunter green. In the post I mentioned earlier, her “deep green” was sometimes purple (?!) but, in all cases, you get what you pay for. Double check!


Awesome job! I might try this very soon!
Awesome! If you do, I’d love to see pictures!
This is bad-ass! It looks so good! Thanks for reading and tagging my blog. I really need to get busy! Thanks, sweet Kelsie
Wallis
So glad you liked it!
I’m going to try this. I have the perfect rug and your details are very specific and encouraging. Jo @ Let’s Face the Music
Great! I can’t wait to see your results!
Oh, this is fantastic!! I’ve got a giant rug in my garage that is too much of the wrong color…however, I think it could look great in blue! As soon as it warms up a bit (I’m in Arizona, so it won’t be long) I am absolutely trying this!
(Popped over from your West Elm IG feature!)
xox
Thanks for stopping by! I’d love to see the results if you do decide to give the DIY a try. 🙂
I have never thought of doing this, but have a rug that is way too red and could use a makeover. Thanks so much for sharing.
I’m making (or trying to make) a huge rag rug and before putting it together I’m going to try dying all the braided rope. It is such a huge mix of materials that I won’t know what takes or what doesn’t until the end. I’m scared.
I get so scared before I do a big project–I don’t want to mess it up and waste the money. But I always remember what my second grade art teacher told me: there’s no mistakes in art!
It’s been a while since you posted this comment, I know. How did it turn out?
Oh!! this is great. Thanks for posting it here.
Thank you! Can’t wait to try this out!
You’re welcome! I’d love to see photos when you do! 🙂
What would you do differently to avoid the mildew? Dry it longer outdoors? It looks amazing?
Thank you! I would dry it longer outdoors and plan the project around the seasons. Right now I have a craigslist wingback chair that I plan to dye in a similar fashion, but I’m waiting for warmer weather. With something so porous, it’ll take a lot of cold weather days to evaporate all of the moisture.
That being said, after using baking soda per an internet search, the mildew smell quickly went away. I’ve been using this rug for over a year now 🙂
Thanks for the quick reply! Summer is almost here so this may be a project for me. We dyed 6 big dropcloths for curtains last year so I know I could make this happen with your great directions. Thank you. Your rug looks amazing!
Have you had any problems with the dye staining the floor?
Not at all. Thanks for stopping by 🙂
I am thinking about doing this but with colors in reverse (ie a blue rug to over-dye with gray and browns) any thoughts?
Did you dry it outside flat or hung over a fence, etc?
Thanks for the inspiration
If the rug is a light blue, it should go over well. I’d recommend doing a test in a small place to see what the color would look like.
I dried it flat outside, but it was too cold and didn’t fully dry until it was inside. What a mess. I’d recommend doing this project when you know warm sunny days are ahead and hanging it over a fence if you have one convenient.
Kelsie thank you for sharing your method and “hiccups” along the way. I’ve dyed linen curtains and having been dying (ha!) to do a patterned cream colored wool rug that is so grubby from repeated cleanings. Now all I need is sunny warm weather to arrive to MA. I just love how yours came out!
Despite what the groundhog said, it may be several more weeks before we get some more warmth here in NE! I’d love to see the results when you try out the project!
I love this idea and appreciate the instructions! I’m wondering if I place some bricks down with secured chicken wire over it, the gap created would allow the rug to dry more quickly…really like an enormous cookie cooling tray?
That’s a great idea! You’ll likely need to use quite a few bricks for reinforcement, a wet rug is much heavier than I expected!
My dad used to hand scrub his wool rugs outside. After scrubbing with soap he would rinse with a hose and use a squeegee to get the water out. Maybe that would solve the long drying time
This is a great idea! Thanks, Laura.
I loved it looked great and you saved a lot money. I too get scared and have to work courage so I understand how you feel.
Thanks for the simple detailed instructions.
[…] remember her from when she flew up to help me prepare my house for showings or when we made that DIY overdyed rug. She showed up on a Sunday and the nursery was empty aside from a couple Crate and Kids boxes and […]
Hey!! I love this and I am actually doing this project myself for my living room. I was reading that the dye only really holds to wool / natural materials and not synthetic rugs. I was wondering if your rug was wool or synthetic? It’s my biggest concern because finding a wool rug in the size I need can get very expensive. What is your thoughts ?
Also I would love to dye my rug red. Can you recommend what rug dye colors to use on a 10ft round rug that is originally cream, yellowish and brown. Very similar to the colors and patterns of the before rug you posted in this post.
RIT has a fantastic resource on their website for color combinations! If you just want straight-up red, I linked the color of synthetic dye on your last comment. Otherwise you can use the site to preview a color you’d like + they tell you the amounts you should use of each color. https://www.ritdye.com/color-formulas/?type=203&hue=196&collection=0&pantone=0
Let me know if you have anymore questions. Would love to see the results of your project!
Mine was a used wool rug from craigslist. RIT had a different formula for synthetic fabrics, but it isn’t as easy to find in stores as the traditional brand. Here’s a link: https://amzn.to/3ewzkm2
[…] Source by rachaelhill858 […]